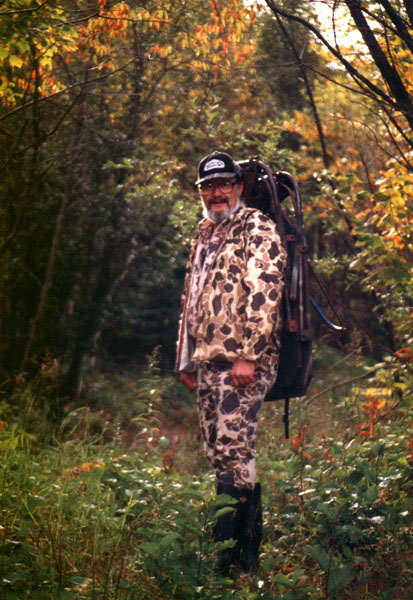
How Big a Job
By
Dr. Ken Nordberg
Photos by Jene K. Armstrong
This is one of thousands of articles authored by Dr. Ken Nordberg and first published in outdoor magazines. This updated article was first printed in Bear Hunting Magazine, May/June 2002 edition. The original 2002 article is largely taken from Dr. Ken Nordberg's book, Do-It-Yourself Black Bear Baiting and Hunting—2nd Edition—which is currently out-of-print.
(Copyright 2013, Dr. Ken Nordberg)
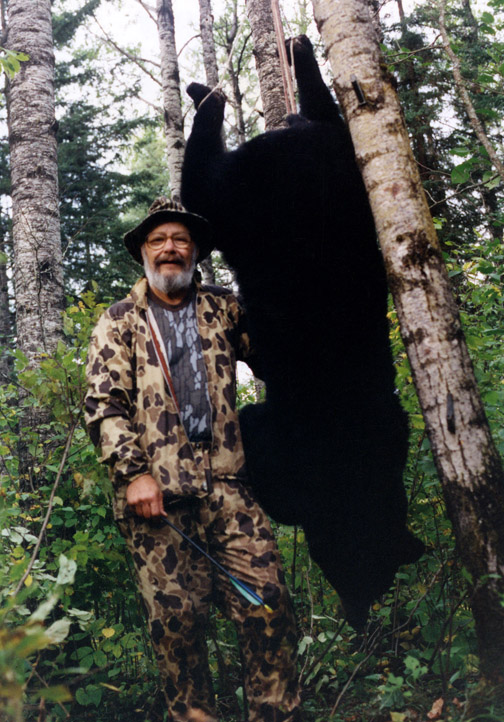
A hand winch ("Come-Along"), pulley and a rope tied around the bear's pelvic bone enabled the author to single-handedly hang this bear in a tree.
You got your bear and you are done field dressing it. Now you are wondering how big of a job it is going to be to get this bear to the cooler or butcher in time to make sure that the meat and hide do not spoil.
In 1989 I shot a 422-pound bear, six-feet long from nose to tail, on the evening of the fourth day of my hunt. Unfortunately, some hours after all but two of my pre-arranged dragging crew had departed for home. Upon completing field dressing the large bear, I realized I had a big problem. There was no way three humans were going to be able to drag this bear 3/5ths of a mile through an alder swamp and forest to the nearest road. We could hardly turn the bear over for field dressing. This job was going to require some special equipment.
Fortunately, the temperature was in the mid-40's. I decided it would be safe to leave the bear in the woods overnight while scrambling for help. The carcass could not be left on the ground, however. The part resting against the ground would surely spoil overnight. Using screw-in tree steps, a stout rope tied firmly around the bear's lower hind legs and a hand winch, we raised the bear carcass up into an adjacent birch tree (I did not want to tie a rope around the bear's neck for fear of ruining the condition of the luxuriant fur).
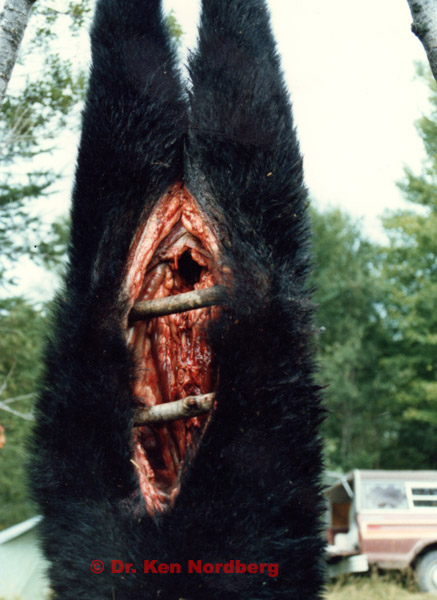
A hanging black bear carcass with its abdominal cavity propped open.
To enhance cooling, I propped the abdominal incision open with a pair of 10-inch long sticks, sharpened at the ends to prevent slipping. Wolves being prevalent in the area, I draped my shirt (damp with perspiration) over the bear's outstretched front legs; fresh and strong human odors will keep wolves away for up to 48 hours.
Shortly after daybreak the next morning, a local logger named Wayne Revell (a shirt-tail relative) and one of his neighbors drove a pair of ATVs, chained together, and a large sled right to my bear, their trail across a spruce bog cleared a bit here and there by me with my chain saw. We dropped the bear squarely on the sled and within 30 minutes we were shoving and pulling it into the back of my pickup for its 1-1/2 hour trip to the butcher.
Did I make it in time? It was close. Happily, I ended up with 276 pounds of bear meat, equal in flavor to any I have ever tasted in all my years of bear hunting and a luxuriant hide that was made into a beautiful and much admired rug.
All other bears taken by my sons, son-in-law and me were dragged via our own power to our waiting vehicles; one, another 400+ pounder, by me alone. Like a couple of years earlier, I had taken this large bear hours after the last members of my restless dragging crew decided it was time to return home. Undaunted, I skinned the hide from the hind quarters and flanks, keeping the hide and paws attached to the front half of the bear and severed them from the carcass at the base of the ribs, creating two parts of roughly equal weight that could be hauled out on my plastic toboggan. A ramp made by tying birch logs together with rope, ladder-fashion, enabled me to drag the two parts up into the back of my pickup.
For a couple of reasons, dragging a black bear from the woods is always a lot tougher than you thought it would be. They cut a much wider swath than a deer, making them seem twice as heavy as they really are, and while being dragged, you must take care to avoid damaging the pelt, the valued, trophy part of a bear.
To make dragging easier by providing a slippery surface and to protect the pelt and meat, we first roll our bear carcasses in a tough, reinforced, plastic tarp and tie the ends securely with ropes, "Tootsie Roll" fashion. Because the plastic tarp is likely to tear before reaching camp, we then roll the front end of the carcass (the widest and heaviest part) onto a plastic toboggan and tie it securely with rope laced through several 3/8-inch diameter holes previously drilled in the upraised sides of the toboggan.
To the ropes at the front end of the tarp and toboggan, we attach one end of a 30-foot length of 1/2-inch nylon or 3/4-inch manila drag rope. A wide loop is tied with a cinch knot at lead end, using about ten feet of rope and then several hand-sized loops, one for each dragger, are tied between this loop and the bear. The wide loop at the lead end is used as a harness by the strongest member of the dragging crew. The leading dragger steps back to this loop and inserts both arms through it, ending up with the front end of the loop behind his neck and both sides of the loop passing around the fronts of both shoulders and back under both armpits. He can then lean forward and drive with his legs while using both hands free to part branches and a handle a flashlight. Behind him, the rest of the draggers grab loops on one side of the rope at intervals wide enough to keep from tripping over one another. Lined up in this manner, a large dragging crew can very efficiently worm its way along a narrow winding trail.
When heading out to drag a bear, remember to take along some cold, liquid refreshments, 1-2 cans per person.
Once the bear is in camp, the work is far from done. First and foremost, you must begin the vital cooling process. Immediately unwrap the carcass from the heat-retaining, plastic dragging tarp and insert some logs under it to get it off of the ground. Wipe blood from inside the carcass with paper towels. Make sure the pelvic canal is completely open (loose tissues and fat may block it). Free air passage through this opening is necessary to preserve the wholesomeness of meat in the rump and hind quarters, the part where a bear's heat-retaining fat is the thickest. If flies, wasps and other insects are attracted to your bear carcass, cover it with cheese cloth or mosquito netting. Do not spray it with insect repellent. If the air temperature is cool enough, in the 40's or less, and if you are not planning to take it to a registration station and/or a butcher until morning, hang the carcass off the ground, propping the abdominal incision wide open with sharp-ended sticks.
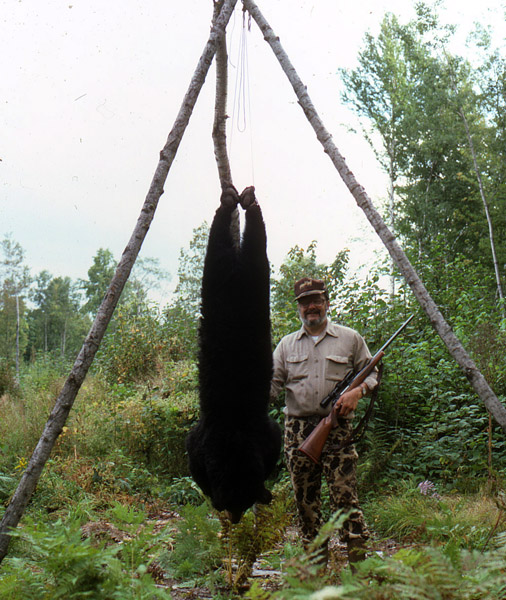
Doc with a bear on a tripod.
(I believe that is Doc's son John's bear from about 1984)
If a heavy tree branch or meat rack is not handy or if you lack a winch or adequate muscle power to raise your bear from the ground, raise it with a tripod (three sturdy poles 15-20 feet long, lashed together at one end). With the lower, free ends of the poles splayed widely and the center of the tripod about six feet above the ground, firmly tie the lower ends (ankles) of the bear's hind legs, or the pelvic bone, to a rope attached to the lashed center of the poles. Use as short a rope as possible, lifting the carcass as high as you can before you tie it. Then raise the bear by sliding, lifting and pushing or pulling the outer ends of the poles toward the bear, one at a time. Using a tripod in this manner, one or two men can raise a hefty bear from the ground without special equipment. A tripod can also be used to load a heavy bear into a pickup or trailer.
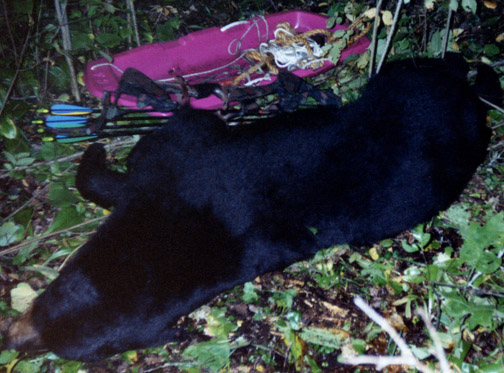
The author had to skin the hind quarters and flanks
and remove them in order to drag (alone)
this very large bear from the woods.
If faced with the prospect of being unable to get your bear carcass to a walk-in cooler in time to prevent spoilage, here is another way to save your meat and hide. Wherever the bear is located, in the woods or camp, the first thing to do after sending someone to town to get plenty of ice and more ice chests if needed, is place the carcass on a clean tarp, or hang it and then skin the bear. If you are being tormented by mosquitoes and/or flies and wasps are being attracted to your bear carcass, erect a screen tent over it, on a couple of hunts I was very thankful for having brought a screen tent for this purpose.
After skinning, trim from the meat and hide all the fat you can, discarding it. Also, trim off and discard any discolored meat found along the path of your bullet or arrow. Then, using a sharp knife and bone saw—a hack-saw works fine—cut the carcass into portions that will fit into your ice chests. Separate the meat from the melting ice and water by placing the ice in heavy-duty plastic bags. Once you have the hide and meat on ice, you can relax a bit. Your meat and hide will be safe from spoilage for six hours or more.
If you anticipate warm weather or difficulty getting your bear to a butcher in time to prevent spoilage, take at least five large ice chests loaded with block ice to camp, one for each quarter of the bear carcass and one for the hide, head and paws attached. Block ice will last up to a week if four to five pounds of dry ice is added to each cooler, the coolers are sealed with duct tape and then stored in the shade. (Keep in mind, if dry ice is used, it needs to be able to vent off the expanding gas.)
If you are really up a tree and have no ice available, double seal each part of your cut-up bear in waterproof plastic bags, getting out all of the air, and drop them into a shady spot in a cool stream or lake. Depending on how cool the water is, this will give you some breathing room.
Your bear pelt can be preserved with salt. The only trouble is, if salt is your only alternative, you are going to have to skin out the bear's head and paws, a risky undertaking if you don not know how to properly do it. The tough parts are the ears (preserving cartilage), eyes (saving hide well back into the sockets), nose (preserving hide well back into the nostrils), lips (preserving hide well onto the tissues surrounding teeth and then splitting lips) and toes (saving the toe pads and bones attached to the claws). You might ask your anticipated taxidermist to explain and/or demonstrate how to do it before your hunting trip. After skinning, the must be scraped free of flesh and fat before salting. Apply plenty of uniodized salt, rubbing it thoroughly into all parts of the hide. Then spread the hide fur side down on the ground, or hang it in a shady, airy place to dry. Later, blot or pour off any liquids that gather on the hide, adding more salt to wet spots. Drying will take several days. Once dry, however, the will hold up for a considerable length of time. Keep it dry, well aired and free from insects and wild creatures that eat hides and/or love salt.
Everything you have done to make sure your bear will arrive fresh at a meat processing plant and taxidermist can be easily ruined during your trip home. Especially on a sunny day, never transport a bear carcass in a tightly enclosed space. The worst thing you could do is cover it with a tarp and then close it up in an unventilated car trunk or pickup topper. Regardless of air temperatures outside, latent heat in the carcass, plus heat generated by the sun shining on an unventilated space, can not only ruin bear meat within a couple of hours, but cause hair to pull loose in handfuls (called slippage) from the hide. Wherever you put it for the trip home, give the carcass plenty of ventilation. If you must put it in a trunk, leave the trunk lid open; in a pickup box covered with a topper, open the windows and/or leave the tailgate open.
If the trip home is long, it would be best to have your bear skinned and processed by a butcher near the area where you hunt, picking up frozen meat and the hide at a later date. This is the best way to insure your meat and hide will be of the highest quality.
Daytime temperatures during the black bear hunting seasons are not often favorable for cooling and storing bear meat. Unless you have your own walk-in cooler, it is unlikely you will ever find it convenient to skin and butcher your own bear. It is not uncommon, however, for a butcher to ask, "How do you want your bear skinned?" For this reason, you should know how it should be done.
The way a bear should be skinned depends on what you want a taxidermist to do with it: make a bearskin rug, a shoulder mount or a full body mount.
When necessary to skin it yourself, begin by placing the carcass on its back on a large, clean, plastic tarp spread on the ground or hang the carcass via a stout rope tied around the pelvic bone. The pelvic bone will easily support the heaviest bear. The hung carcass will strange with its hind legs draped downward, but when skinning, do not hang the bear by its legs or neck.
For skinning, you will not need much in the way of tools: a short-bladed knife with plenty of curve near its tip, a sharpening stone and a bone saw. You will find it necessary to resharpen your knife two or three times before you are done. If you do not own a bone saw, a hack-saw with a coarse blade or a cross-cut carpenter saw will work fine.
Skinning is always easier when two tackle the job, one person holding bear parts at advantageous angles and pulling the hide (gloves may be needed to more firmly grip the hide, made slippery by the fat) while the other person whisks the knife blade through the tissues that connect the hide to the carcass.
If you intend to have the hide made into a rug, proceed as follows:
Step 1: Begin by extending the abdominal incision (made for field dressing) up the center of the breastbone to the base of the neck. This will give you more freedom as you skin from the hind legs toward the head.
Step 2: Skin the hind legs. This job is a bit tricky. If you were to cut through the hide on the inner side of a hind leg along a straight line from the center of the bear's crotch (or chest) to the center of where its paws begin, you are likely to end up with a rug that has paws positioned at weird angles. To make sure paws end up extended straight outward on your rug, your inside leg cuts must end an inch or two short of the heal portions of the bear's paws. Even better, extend your inside centerline cuts (starting from the abdominal incision) only half way toward the paw of each leg and then skin the lower half of each leg as if pulling off the sleeve of a tight-fitting sweater. Upon discovering the hide is fully intact on each lower leg, your taxidermist will be overcome with joy.
The first hind leg is always the toughest to skin, everything goes much easier after that. Insert the tip of your knife, blade side up, under the hide halfway between the front and back of the bear's hind leg (ham) at the abdominal incision and cut through the hide on a straight line along the center of the inner leg halfway to the paw. Then start peeling the hide away at one of the right angle corners you have created in the crotch area, lightly sweeping your knife blade across the tissues directly beneath the hide as you pull the hide back. At this point, do not attempt to end up with a hide completely free of fat and tissue or you are liable to end up with a hide full of holes. Let your taxidermist do the fleshing. He would much rather do this than have to patch a lot of holes. Stretch, pull and skin the hide as far as you can around the front and back halves of the leg. Now, by forcefully bending the knee as far as it will bend, you will be able to begin skinning your way down the bear's lower leg. If the knee does not bend enough, carefully cut through exposed cartilages of the knee. You may have to extend your initial inside cut in the hide a few inches in order to cut into the knee enough to get it to bend. Skin the hide from the lower leg, rolling it down like a sleeve as you go until within a couple of inches of the paw. About an inch above the edge of the rolled hide, cut into the muscles and tendons of the lower leg, exposing the underlying bone. With your partner holding the hide back to prevent damage from your saw blade, saw through the leg bone. Once the bone is cut, it will be very easy to finish skinning the entire leg, ending up with a sack-like hide with the paw attached to the end.
Be very careful when skinning around the bear's rump. There, the bear's little tail is easy to inadvertently cut off. Inside the tail are a series of small bones. Carefully cut through the tissue between bones closest to the underlying rump muscle. Leave the bones intact inside the tail. When this is done, you will be able to skin completely around the bear's rump and lower back, making the other hind leg much easier to skin. As before, make your center cut through the hide on the inner side of the other hind leg, halting when you get to the knee. Finally, after skinning the lower leg, saw off the other hind paw at the ankle, as before.
Step 3: Skin off the hide to the bear's forelegs.
Step 4: Skin the front legs. With your partner holding a front leg straight and fully extended, bent somewhat outward and at a right angle to the bear's body, tips of claws parallel with the bear's breastbone and the foot pad facing in the same direction as the breastbone, make a right-angle cut through the hide from the incision on the bear's breastbone to the center of the inner side of a front leg and thence halfway to the end of the leg. Skin this leg like a hind leg, finally cutting through the muscles, tendons and bones about three inches above the paw, keeping the paw attached to the hide. Repeat this process on the other front leg.
Step 5: Skin the neck. After skinning the front legs, continue skinning the hide from the bear's body down to the end of the cut at the base of the bear's neck. The hide of a black bear's short and thick neck is very firmly attached. Like pulling a tight, turtle-necked sweater from the head of a human, your partner should pull the hide steadily and firmly toward the head as you carefully cut through the tough tissues that connect the hide to the neck. Skin the neck as you skinned the lower parts of the legs, making no cuts in the hide. When you can feel the angles of the bear's lower jaw beneath the fold of hide as you proceed toward the head, you have gone far enough. About an inch or two back from the fold of the hide, cut into and completely around the neck muscles and other tissues to the bear's neck bone (spine). Cut through this bone with your saw.
That's it. You are done. You now have a one-piece hide with head and paws attached.
If you can not deliver the hide to your taxidermist immediately, roll it up, drop it into a large plastic bag, seal it, and store it on ice in a cooler, in a refrigerator or in a freezer until delivery can be made. Do not store a bear hide in a freezer more than a few weeks because it may soon begin to suffer ruinous freezer burn.
If you are going to have a shoulder or wall mount made, except on the front legs, do not cut the hide anywhere forward of the back end of the rib cage. Do not extend the abdominal incision up over the breastbone as you would for a bear rug and do not make a cut up the back of the neck as would on a white tailed buck. To make sure you end up with a beautiful wall mount, either skin the entire bear as you would to have a rug made (without cutting the hide over the breastbone) or provide the taxidermist with an uncut hide from the entire front half of the bear, cutting through the hide completely around the bear's body where the ribs meet the abdominal cavity. For a good shoulder mount, the upper half of the hide of the front legs should remain attached to the hide.
If you are thinking of a full body mount, the fewer cuts you make in the hide, the better. Though it will be tedious, skin the entire bear without making additional cuts in the hide except those recommended for skinning the hind legs, half way to the paws, and do not extend the abdominal incision up over the breast bone. When you get to the front half of the bear, remove the balance of the hide as if removing a long-sleeved sweater with mitts attached. Be especially cautious when skinning around the folds in the hide around the upper ends (elbows and armpits) of the bear's front legs. Cut the paws and head from the carcass, as when skinning for a bearskin rug.
Upon delivering your hide to a taxidermist, you are certain to be asked, "Do you want your bear mount to have snarling lips?" It is a matter of personal preference. Most hunters, it seems, prefer snarling lips, enormous bear fangs bared. To those who have never hunted black bears, the sight of a snarling black bear implies the beast was truly dangerous, and the hunter who shot it was truly courageous. Personally, I see nothing wrong with it. Two snarling bear are near me as I write this: one is my biggest, record-book black bear. While some may look down on snarling lips and though neither of these bears actually snarled at me, it really did take every ounce of courage on my part to face them, especially while armed with a bow. Without their snarls, these wonderful bears would somehow be less than what they really were. They could never fit the mold of being benign and harmless, as some people insist black bears are. Nope, to me they simply would not look right without their snarls.
The snarl of Doc's grizzly bear.
(This bear was attacking their base camp.)
Though it is unlikely you will ever find it convenient or necessary to butcher a bear, the butcher you take your bear to for this purpose is also likely to ask you, "How do you want your bear cut up?" Thus you should know something about butchering too.
From a medium-to-large black bear, a butcher can make all of the cuts traditional for beef, pork or venison, all steaks or chops and roasts ending up looking exactly like those you see in a grocery store, only a bit smaller in size. Having eaten many black bears during the past four decades, and having butchered quite a few, I have found I personally prefer having my bear meat cut in a less traditional way.
Take the loins, for example, from which come the choicest, most tender and juiciest cuts of bear meat. Loins are the long bundles of meat (back straps) extending from the base of the neck to the rump on either side of the spine. From the rib section comes rib steaks, chops or rib roasts, from the abdominal section comes T-bones, and from the hind quarter section comes sirloins and rump roasts. I much prefer having the loins trimmed from the bone, fat removed, and cut into 1-inch steaks from end to end. If you prefer, leave the rib and rump sections in one piece; they make superb roasts.
Though somewhat tougher, black bear round steaks are nonetheless delicious. I therefore instruct the butcher to cut the rounds (hams) into 1-inch thick steaks.
From shoulders come wonderful chuck roasts. I instruct the butcher to cut chuck roasts 1-1/2 to 2-inches thick with the bone left in.
Neck, flanks, ribs, brisket, hocks and shanks should be trimmed of fat, sinew and bone. The thicker and more tender portions should be cut into stew meat (you will wish you had more) and the thinner or tougher portions should be made into ground bear meat. Bear fat has excellent flavor and it does not stick to the roof of your mouth like venison fat. Therefore instruct your butcher to mix bear fat (15%) with your ground bear meat.
Black bear meat also makes marvelous sausage. Some hunters I know have their entire bears converted to various kinds of sausage.
Have the butcher wrap and quick-freeze bear meat in whatever sized portions you prefer. Tightly wrapped in freezer paper, your frozen bear meat should remain tasty for 6-12 months. Be sure to label and date your bear meat so no one mistakes it for any of those lesser meats bought from a grocery store.
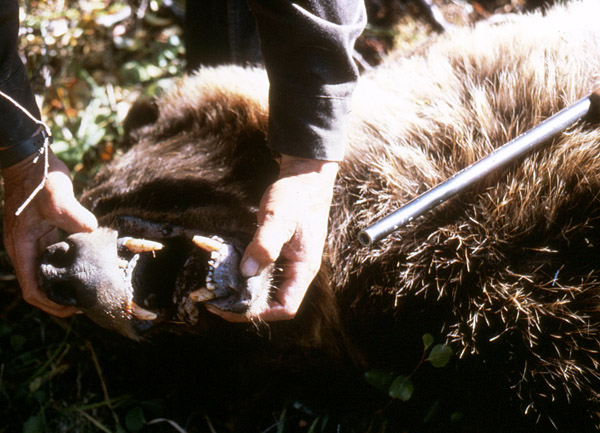
When discussing with a butcher how you want your bear cut up, be sure to instruct him (or her) to avoid cutting any bone from the skull. In 1990, a butcher sawed a sizable chunk of bone from the back end of the skull of a black bear I took with a bow. After the 60-day waiting period, that bear's lopped-off skull only measured 17-7/8 inches, just missing the book.
While your bear's skull is covered with hide and flesh, it is nearly impossible to determine whether or not it will qualify for a record book. Even after a skull is fleshed out, it is difficult to estimate what it will measure after the required 60-day waiting period. Sadly, lots of big bear skulls shrink out of contention during this period. In my youth, hide measurements (length from nose to tail plus width from front claw to front claw divided by two) were widely accepted as the best means of determining the relative size of a bear. When it was discovered some hunters were stretching the truth by tying green hides horizontally of the ground between trees and then throwing boulders on them to stretch them, the bear skull measurement system was born. Unfortunately, some very large bears have relatively small skulls and some small bears have relatively large skulls. It is not the best system, but nobody thus far has figured out a way to stretch a bear skull.
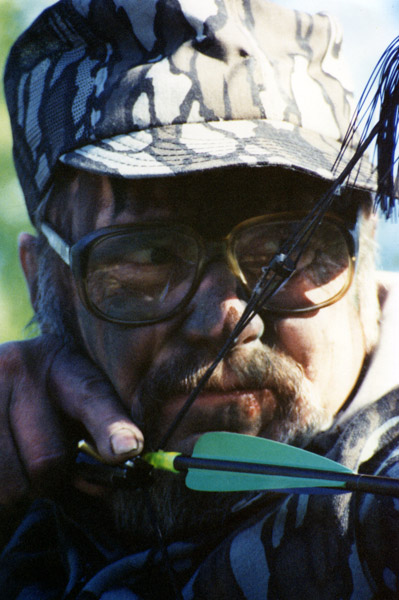
Doc at full draw.
To qualify for the Boone and Crocket Record Book, a black bear taken by fair chase methods must have a combined length plus width (straight-line) skull measurement of at least 21-inches. To qualify for the Pope and Young Record Book (bow kills only), the combined score must be at least 18-inches. Following a 60-day drying period (boiling unnecessary), skulls must be measured by official scorers to qualify. A black bear can qualify for both record books if it has a combined score of 21-inches or more.
Official scorers are common in every U.S. state. Many can be reached by inquiring at state big game management headquarters, or at state agencies that keep big game records. Information may also be obtained by writing to or visiting their web sites:
(Doc has placed this article on his web site for his bear hunter fans, partly because his bear books are currently out-of-print.)